

 Image credit: source
Are you looking to add a touch of elegance and relaxation to your porch? Look no further than a porch swing bed. In this guide, I'll show you how to build a superbly simple yet stunning porch swing bed using materials readily available at your local Lowe’s Home Improvement Store. Whether you're a seasoned DIY enthusiast or a beginner, this project is perfect for you. So, let's get started and create a show-stopping porch swing bed that will become your favorite place to unwind.
A Dreamy Porch Swing Bed
A porch swing bed offers both beauty and functionality. Not only does it make you look like a skilled craftsman, but it also gives you an excuse to indulge in more naps. And who doesn't love that?
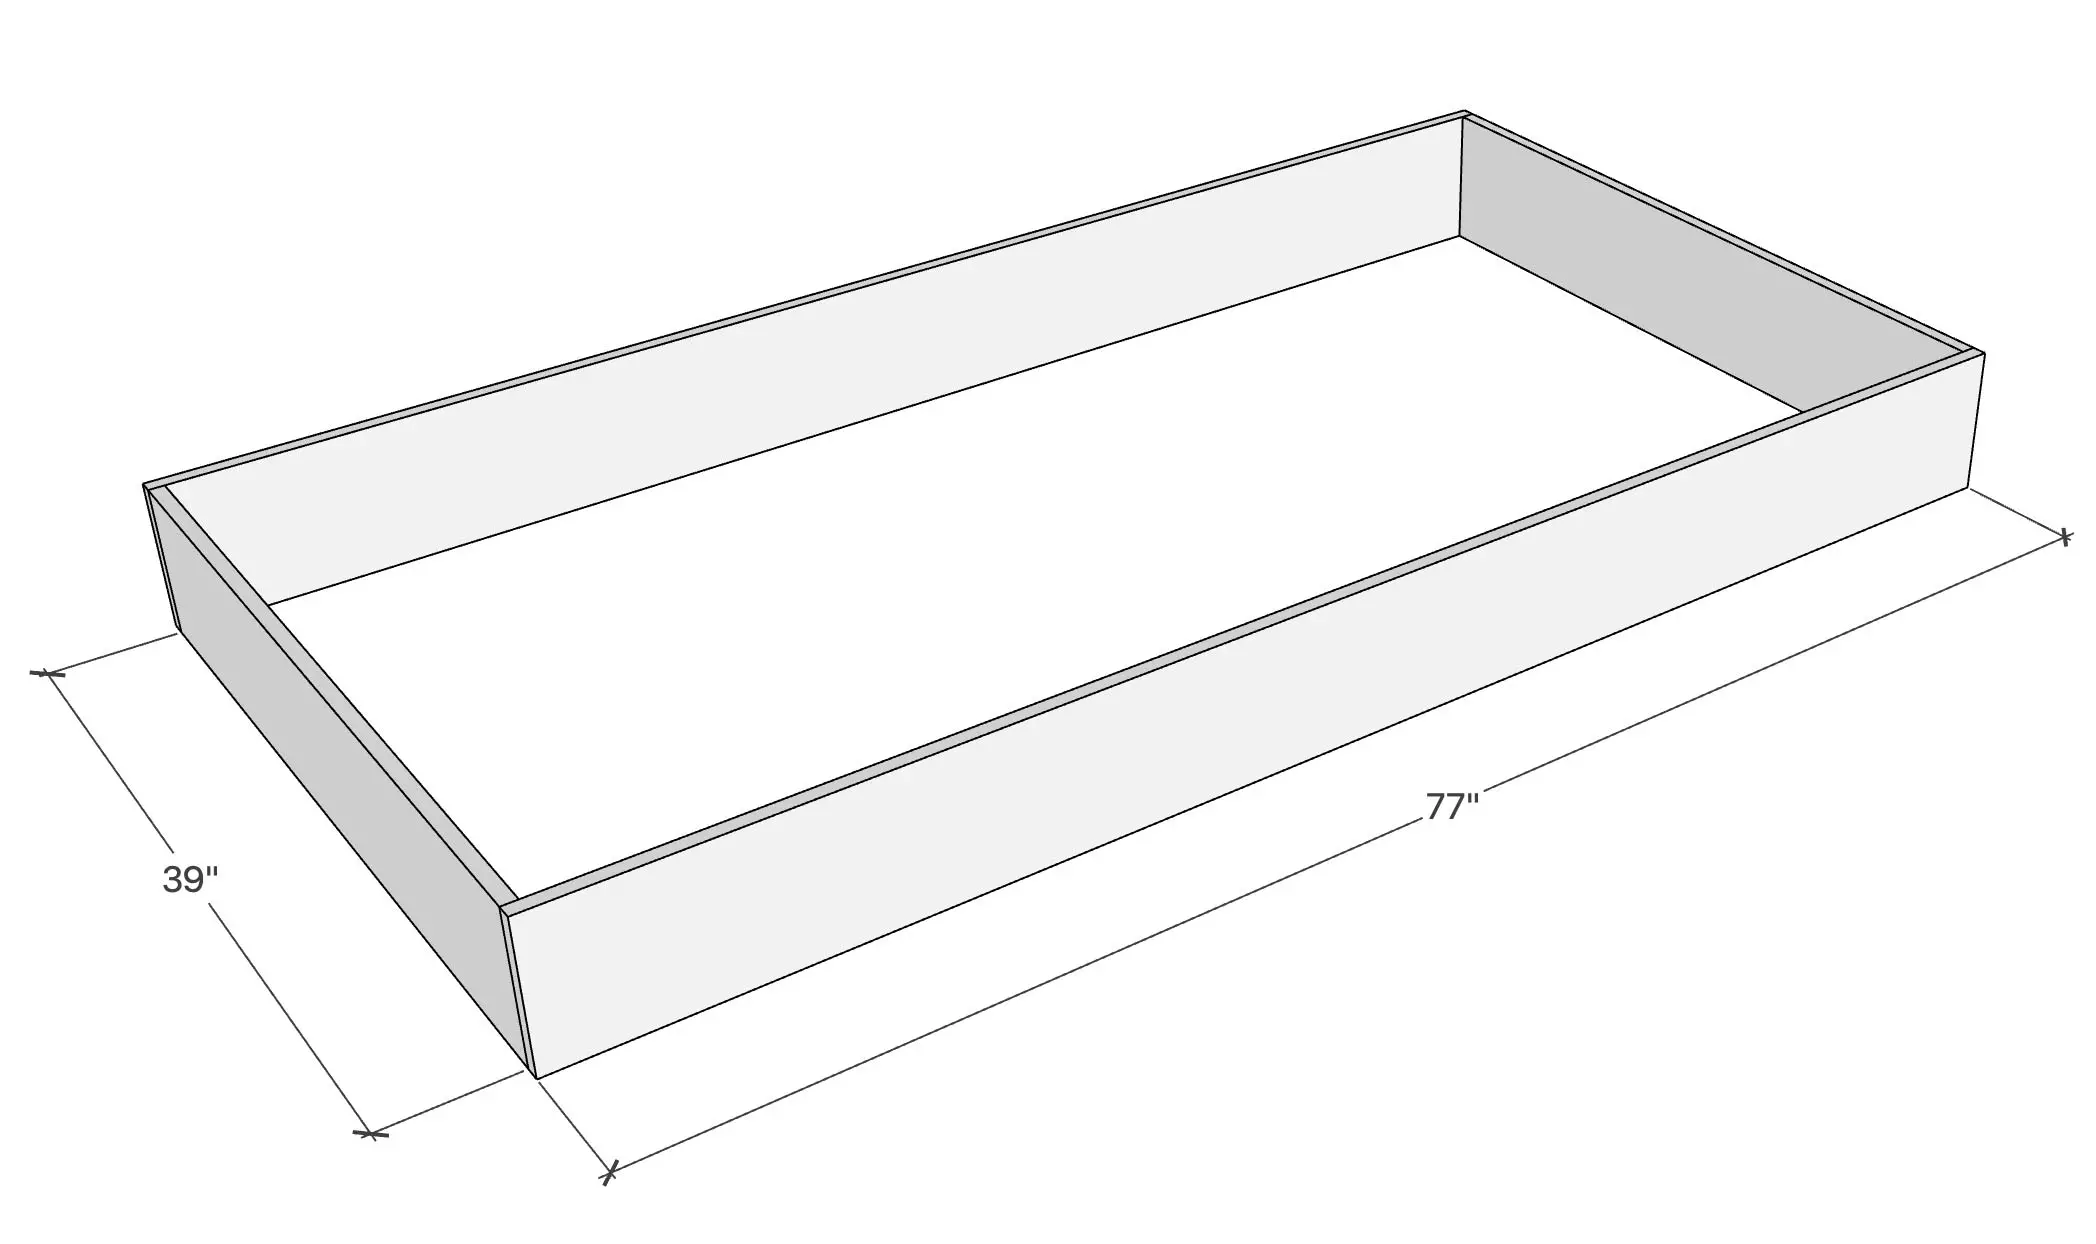 Image credit: source
Before we dive into the building process, take a moment to explore some alternative designs. We've got plans for different variations and even a modern porch swing bed. These plans will inspire you and give you the flexibility to create the porch swing bed of your dreams.
If you want to simplify the building process, I recommend using our printable plans, which include a complete SketchUp 3D model. This will make your project much easier to tackle.
Gathering Materials
To build this porch swing bed, you'll need the following tools and materials:
- Finish Nailer
- Tape Measurer
- Wood Glue
- Wood Stain
- Wood Filler
- Miter Saw
- Sand Paper
- Jig Saw
- 4 Eye Screws
- 1 1/4″ Finish Nails
- 2″ Finish Nails
Wood
- 3 pieces of 1″ x 8″ x 8′ clear pine
- 12 pieces of 1″ x 3″ x 8′ clear pine
- 1 piece of 1″ x 4″ x 8′ clear pine
- 2 pieces of 2″ x 3″ x 8′ framing lumber
- 1 piece of 2″ x 4″ x 8′ framing lumber
- 4 pieces of 1″ x 6″ x 8′ knotty pine
Step 1: Building the Porch Swing Bed Frame
Let's start by building the main bed frame using 1x8 lumber. You'll find the detailed measurements in the illustration below. Attach the frame using 2" finish nails.
Image credit: source
Next, add an inner frame for support and to provide a surface to attach the bed slats. Use 2x4 lumber for the sides to add extra strength for the eye screws. Make sure the bottom of the 2x4s aligns with the bottom of the frame. Attach them using 2" nails. For the front and back, use 2x3s, ensuring that the top aligns with the top of the 2x4s.
To create the support for your mattress, cut eight 39" long pieces of 1x6 knotty pine and space them evenly, 4 1/2" apart, along the inside of the bed frame. Nail them securely in place.
Step 2: Constructing the Posts
The next step is to construct four posts using 1x3 clear pine, one for each corner of the swing bed.
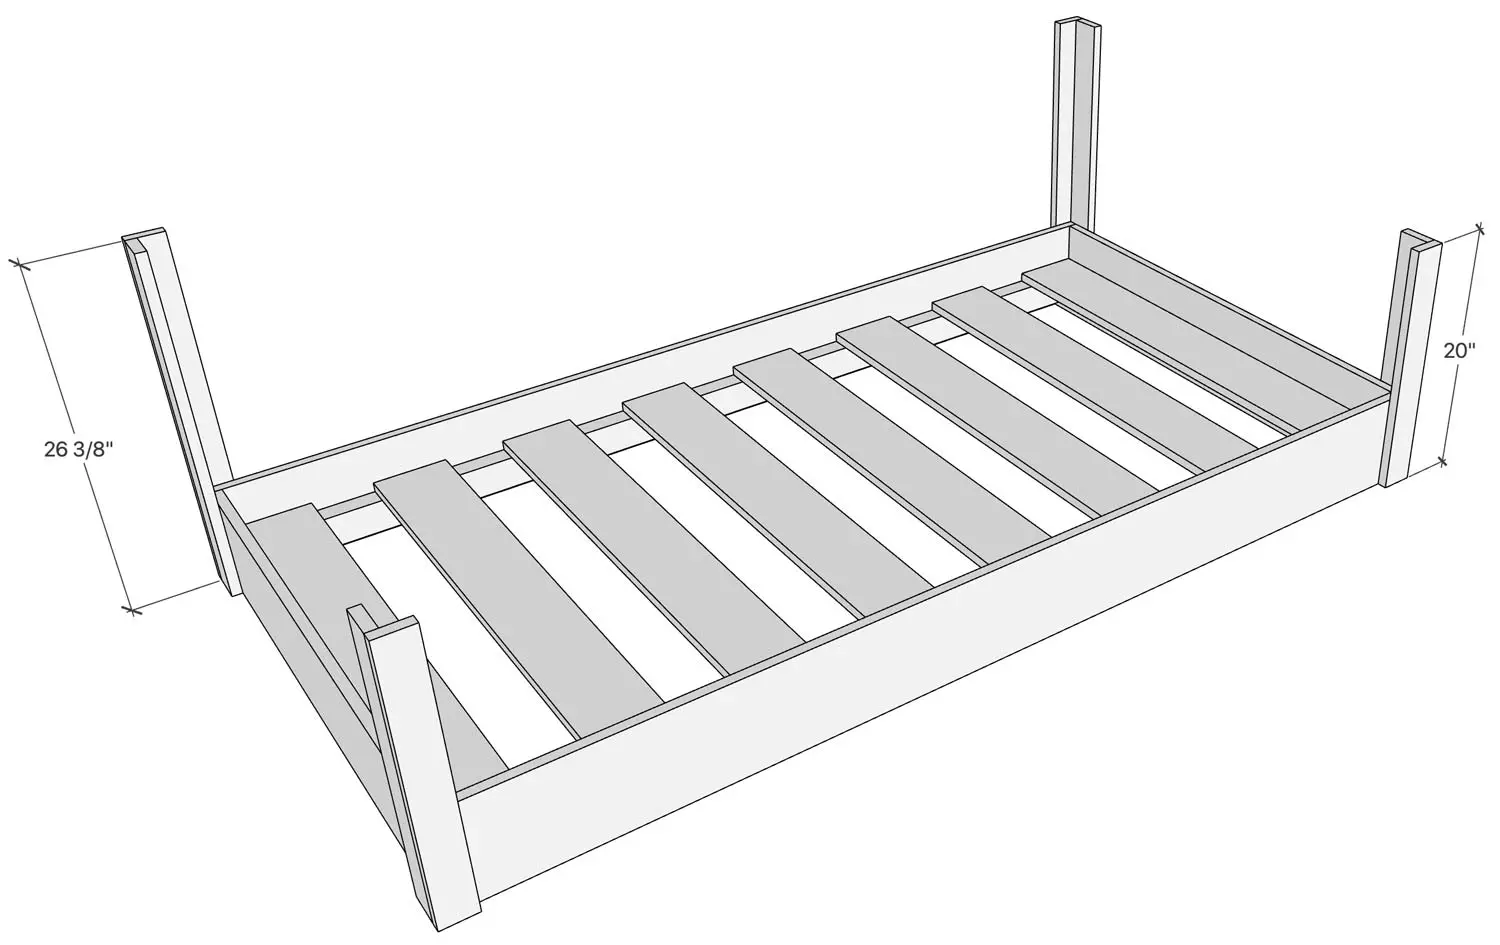 Image credit: source
Each post consists of two pieces. Apply wood glue along one edge of the first piece and place the second piece on top, forming an "L" shape. Ensure that the edges are perfectly aligned, then nail them together using 2" nails.
Attach each post to the corners of the swing bed frame using glue and 1 1/4" nails.
Step 3: Adding the Rails
With the posts in place, it's time to add the rails. These horizontal pieces will connect all of the posts. Begin by attaching the back rails, followed by the side rails. Refer to the illustration below for detailed lengths and spacing.
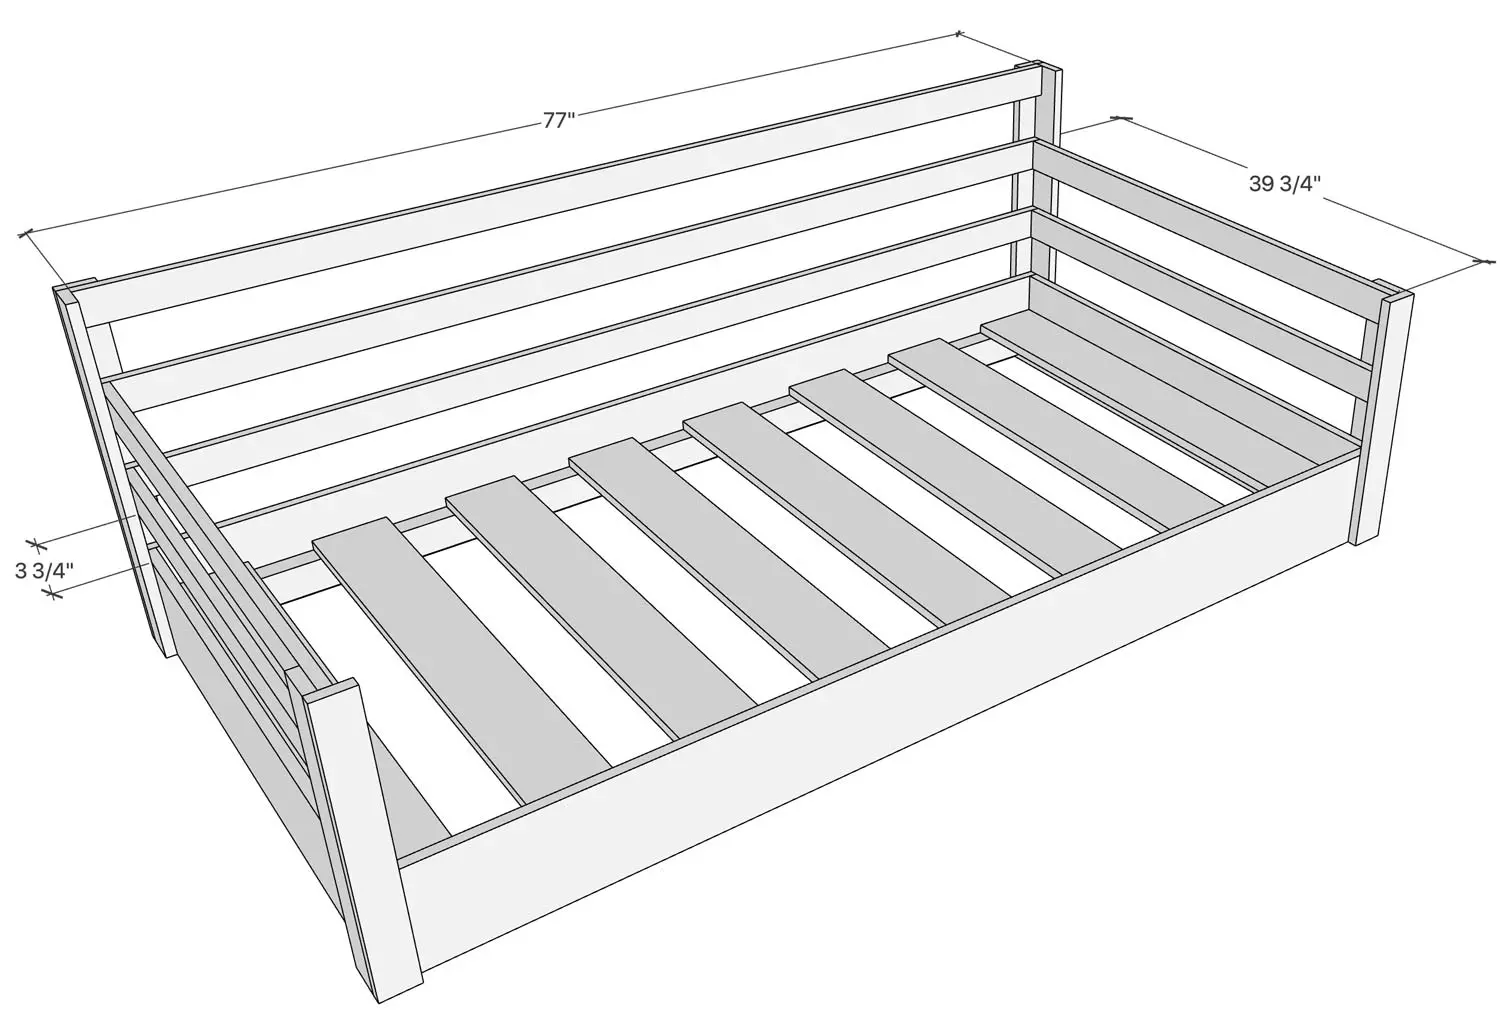 Image credit: source
While this swing bed is designed for simplicity, the armrests require a bit more cutting. Cut each arm piece from a 1x3 board and use a jigsaw to create a notch that fits around the back post.
Secure the armrests in place using glue and nails, as shown in the illustration. Complete the look by adding 1x3 trim around the bottom of the swing with glue and 1 1/4" nails.
Finally, add a top piece using 1x4 lumber and a middle rail support using 1x3 lumber.
Step 4: Finishing Touches
Fill any holes with wood putty and sand the swing bed to round off the corners and remove any splinters. Apply a coat of stain followed by three coats of polyurethane for added protection.
 Image credit: source
Step 5: Hanging the Swing
Once everything is dry, it's time to hang the swing. Attach eye screws to the swing bed, ensuring they are screwed into ceiling joists. Use the same eye screws in the ceiling, making sure the swing is securely suspended. For added comfort, use a twin mattress and consider ordering a custom mattress cover and adding some pillows.
Congratulations! You've successfully built your very own porch swing bed. Now, find a cozy spot on your porch and enjoy the blissful moments of relaxation.
I hope you found this tutorial helpful. If you have any questions or need further assistance, please leave a comment below. Happy swinging!


