

Sales listings are a lucrative source of income for any real estate agent—and a real estate listing checklist streamlines the management of marketing, negotiations, deadlines, and seller expectations. Your checklist should include items to complete before listing the property, during the active listing, and throughout the closing process. My team and I have created a checklist and full breakdown to help you and your clients easily track progress and ensure every stage of the sales process gets completed before moving on to the next.
Stage 1: Pre-listing Checklist
In the first stage of our real estate listing checklist, you must take several steps before a property becomes your exclusive listing. The pre-listing stage requires establishing trust, building rapport, and demonstrating your value as a real estate professional to potential sellers. By being organized and prepared during the pre-listing stage, you will secure the listing and instill confidence in your abilities to provide a seamless transaction for your clients.
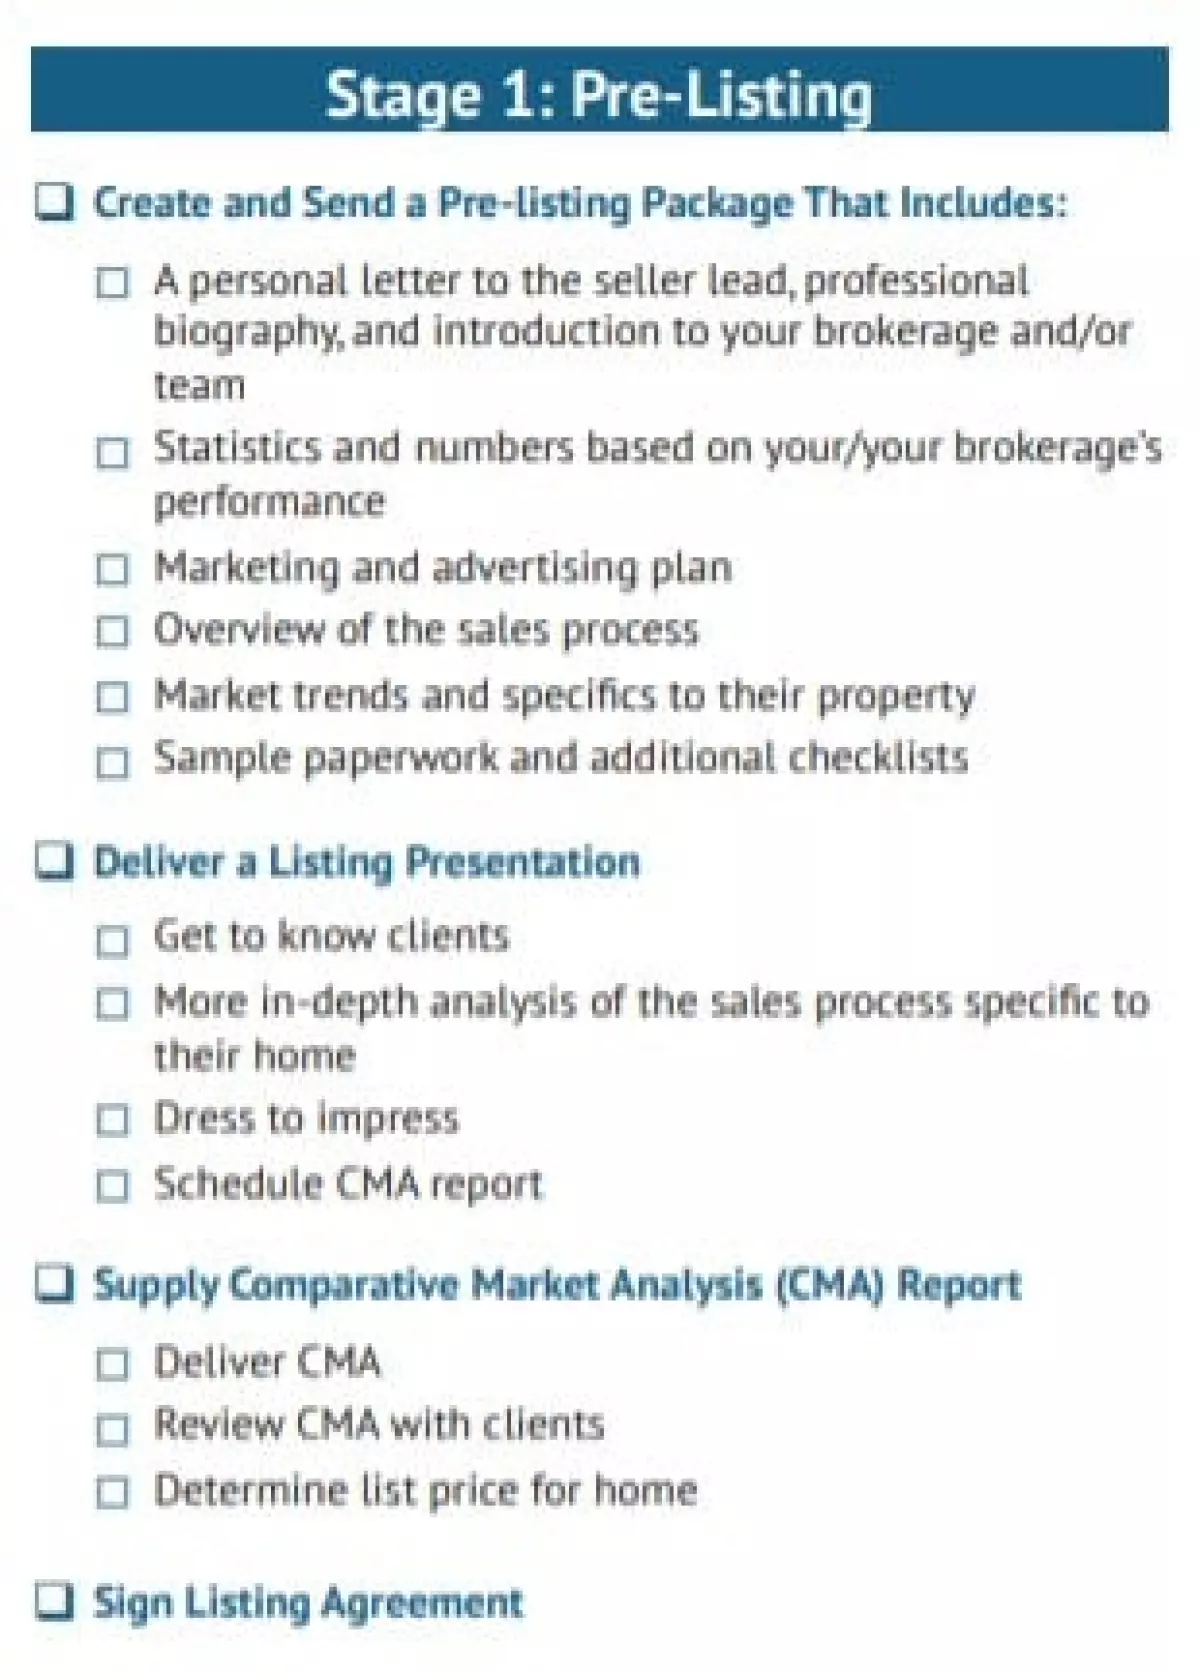
Present Your Pre-listing Package
First impressions are everything, especially when it comes to the stressful and complicated process of selling a home. When you first encounter a potential seller, send them a pre-listing package or pitch deck.
A pre-listing package aims to introduce yourself and your real estate services so the prospect will decide to work with you, or at least invite you to continue the conversation. A well-organized and comprehensive pre-listing package can be the catalyst that turns a random lead into a loyal client. Your real estate pre-listing packet should include the following items:
- Introduction: A personal letter to the seller, professional biography, and introduction to your brokerage and team
- Statistics: Numbers based on performance; for example, how many homes you’ve sold, the average number of days on the market, and the percentage of homes sold over ask
- Marketing and advertising: The basics of your marketing plan showing how you plan to gain maximum exposure for the property and the tools you employ to generate qualified buyer leads
- Sales process: An overview of the sales process so clients are aware of what happens during each stage, what they will have to do, and what you and your brokerage will do throughout the process
- Information about the seller’s property: Include market trends in the seller’s area and an overview of the techniques you will use to price the property in your comparative market analysis (CMA)*
- Paperwork: Samples of contracts and disclosures the seller needs to sign to employ your services and listening questionnaires for sellers to expand their knowledge
*The CMA will be produced after you present your full listing presentation or may be made as part of your presentation if you’ve had a chance to thoroughly examine the seller’s property.
The pre-listing package is typically sent to a potential client via email, mail, or in person. The right pre-listing package can set you up for success, so it’s essential to ensure it stands out from the crowd. If you need graphics and images for your pre-listing package, use Canva’s premade templates and customizable images. Canva can take your simple pitch deck and elevate it to a work of art with stunning design elements that impress clients.
Deliver Your Listing Presentation
After your prospect has previewed your entire pre-listing package, they’ll be ready to invite you to deliver a complete listing presentation. Although this is similar to the pre-listing packet and may contain some of the same elements, there are distinct differences between the pre-listing package and the listing presentation.
The listing presentation is more specific to the seller’s home than the materials presented in the pre-listing package. It will be delivered in person or live through virtual means like Zoom, so dress your best and practice your pitch before showing it to the sellers. Other components of the listing presentation include:
- In-depth description of your marketing strategy: Include samples of past materials, market statistics particular to their home and area, and your pricing strategy for their home.
- Identification of your client’s pain points: Uncover their experience with the sales process, motivation for selling, fears, and unique pain points. For instance, they may be moving because they purchased a home elsewhere and need to sell the property quickly to close on their new home within the next three months.
- Addressing their pain points: The pain point is the need to sell quickly, and they may fear that being unable to do so will cause them to lose the home they want to buy. Pay attention to that pain by telling them how to expedite the sales process and alleviate their fears by detailing the steps you’ll take to make their transition between homes seamless.
Compared to the other elements of the real estate listing checklist, the ultimate goal of the listing presentation is to show how your value as a real estate professional will complement their needs.
Produce a Comparative Market Analysis Report to Determine the Price
Once you know your clients better, and they have a deeper understanding of your services, you will produce a comparative market analysis (CMA) report to establish their property price correctly. The importance of this report can’t be understated, as pricing the home correctly the first time saves you and your client time and money in the long run.
Your CMA will take into account the home’s size and the number of bedrooms and bathrooms, condition, overall property size, outbuildings, standout features, finishes and flooring, renovations, and updates, as well as current market trends and homes that recently sold or are currently on the market. Using all these elements lets you compare the subject property to others in the area to determine the most appropriate list price.
Reviewing the CMA report with your clients rather than sending it via email is best because it will help clients understand the thought process behind the facts and figures you’ve gathered. Allow them to ask questions and make comments to clarify the details. Also, ask them to weigh in and be comfortable with your suggested price to settle on the definitive list price as a team.
Sign the Listing Agreement
The final stage of the pre-listing process on our listing checklist is for all parties to sign the listing agreement, solidifying the relationship between you and your client. The listing agreement gives you the exclusive right to list, advertise, market, and assist in selling your client’s home within a specific time frame.
Once the listing agreement is fully executed, other agents can only advertise or assist your clients with your consent. Showings, open houses, offers, communication, and all other process aspects must go exclusively through you as the seller’s agent. Keep in mind that each state and brokerage has its own version of a listing agreement document. You can ask your brokerage where to find it or download generic listing agreements online, like this one from eForms.
Stage 2: Active Listing Checklist
Once you’ve signed official paperwork, the pre-listing stage is complete—but your role as a sales agent is just starting. In the active listing stage of our listing checklist, you do the heavy lifting to get as much exposure as possible for the home. In addition to generating buzz about the listing, you’ll also be able to generate viable buyer leads who may be interested in purchasing the property. This can be done in various ways, leading to offers and, eventually, an executed sales contract.
Prepare the Home Listing
When it comes to first impressions, the little things, like cleaning, decluttering, organizing, and repairing your home before the listing, are essential. This makes a striking improvement in the overall appearance of your home.
Here are the activities you can do to prepare your home for listing:
- Decluttering: Remove all the unwanted and unnecessary items in your house. You can donate the items to charity or neighborhood sharing groups.
- Deep cleaning: This step will probably involve the most extensive time investment, but it may be your most crucial step. Pay close attention to often-neglected areas and kitchens and bathrooms. Also, dust the ceiling fans and clean the inside and outside of your windows.
- Organize closets, cabinets, and drawers: Many potential buyers will open cabinets and closets because they are thinking about storage space. Clean and organized storage areas signal buyers that you take care of the house.
- Make minor repairs: Small repairs will help your house make better first impressions. You can fix any leaking faucets and running toilets, freshen up or repair grout, repair any wall or ceiling blemishes, fix cracked or broken windows, and replace or repair damaged window screens and burned-out lightbulbs.
- Stage the home: While home staging is not required, 81% of buyers’ agents claimed that a well-staged home made it easier for buyers to visualize the home as their own. Research local companies that can deliver furniture and decor to stage the home or hire a virtual staging expert to assist in beautifying the home for buyers.
In addition, enhancing the property’s curb appeal can charm potential buyers with the exterior, so they look forward to coming inside. You can trim bushes, shrubs, and trees, repair broken downspouts and gutters, clean the driveways and walkways, put out some flower pots in the yard, and freshen up your doorstep with a new welcome mat.
Implement Your Marketing Strategy
Marketing the property is a quintessential piece of the sales process because it maximizes the potential for your listing to reach your intended target audience and generate potential buyers. One of the most basic first steps is to install a lawn sign and a flyer box on the property, but that’s not all. Use numerous marketing strategies and techniques to gain exposure for an active sales listing. Some of the most commonly used tactics include the following:
- Photography and videography: Professional photos and videos are important for all other homeselling marketing and advertising. High-quality photos and videos can help your listing sell quicker, make the seller’s home stand out, and attract buyers and sellers to your real estate business.
- Social media marketing: Some free forms of marketing you can leverage to capture leads include Instagram, Facebook, Twitter, and LinkedIn. Each platform has a broad and unique audience makeup that enables you to reach thousands of people very quickly. Try Sprout Social, a social media manager for realtors providing robust social media management and search engine optimization (SEO) tools.
- Direct mail and email: Promote listings using postcards, brochures, letters, emails, and newsletters. Remember to send information about the listing to targeted audiences likely to be interested in seeing the seller’s property.
- Websites and landing pages: Publish a website, landing page, or even a single-property website for the listing with stunning visuals, descriptive copy, and a solid call to action to attract buyers through lead capture forms.
Advertise Your Listing
As part of your marketing plan, promote your listing through paid real estate ads to reach particular target audiences and extend overall reach. Be mindful of your budget, but also recognize that advertising can offer a significant return on investment. Investing in ads demonstrates your commitment to helping the seller quickly achieve the highest possible sale.
Maximize your property’s exposure by listing it on various platforms, including your local multiple listing services (MLS), Zillow, Trulia, and Realtor.com. These sites are frequented by millions of users daily, ensuring immediate visibility for potential buyers.
Additionally, invest in paid Facebook real estate ads or Google real estate ads. You can also look into paid advertising through Instagram and LinkedIn, targeting specific demographics, locations, and interests. While you don’t have to advertise on every platform, use two or three options to capture as many leads as possible.
If you aren’t particularly tech-savvy, use lead generation tools, like those from Zillow, to assist your advertising efforts. With over 200 million unique monthly visits, you can gain wide exposure and high-quality leads. It also lets you connect with clients in your target ZIP codes by featuring you on many of the most popular real estate search sites, like Trulia.
Schedule Open Houses & Showings
Once your advertising and marketing magic have attracted attention to your listing, it’s time to have potential buyers visit the property. In addition to ensuring the property is prepped and ready, set specific times and dates with your sellers to hold open houses and buyer showings. Virtual tours on real estate websites can also be appealing, especially to out-of-town or relocating buyers, and let you capture their contact information using web forms.
Individual buyer showings are generally scheduled as they are requested. Many consider Sunday afternoons the traditional time to hold an open house, so having them during that time can attract homebuyers looking to drop by the property. Take a look through our guide on how to host an open house and download the free open house checklist for listing agents to ensure you’re ready.
Another important task to add to your listing checklist for realtors is to ensure you supply an open house sign-in sheet or use a digital sign-in system like Spacio by Homespotter. Spacio will help follow up with visitors, especially buyers interested in putting in an offer on the home. Generate reports that outline the attendees, quality of leads, and sources to provide your sellers with detailed information on the progress of selling their homes.
Execute Negotiations & Contract
The negotiation phase tends to be the most stressful time for clients, but this is where your role and negotiating skills as an agent can excel. As the liaison between the buyer, buyer’s agent, and your seller, it’s essential to strike a balance between being professional, assertive, and sensitive with all sides of the transaction.
Make sure you present all offers and discuss with your clients whether they’d like to reject, counter, or accept each offer. Provide valuable insight and market knowledge to help your clients make an educated decision without being overbearing or heavily influencing the final decision.
While you are a resource and the messenger between both parties, your client should feel as though you and they are working as a team to accept an offer that helps them achieve their goals and one they are comfortable with. Once concluded, be sure to expedite contract documents for signature right away.
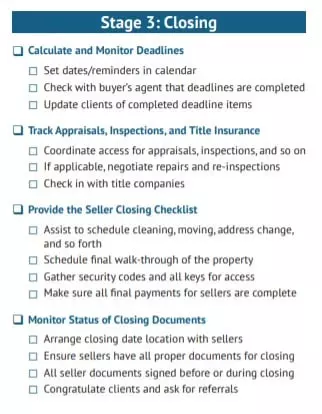
Stage 3: Closing Checklist
Now that you’ve executed a sales contract between the buyers and sellers, you’re in the home stretch of the transaction, but there’s still a lot for you to check off on our listing checklist. Other players in some states are introduced during the closing phase, such as appraisers, lenders, title companies, and even lawyers. In the closing stage, you act as a moderator to ensure everything gets done and runs smoothly up through the final closing date.
Calculate & Monitor Deadlines
Part of your job is to ensure your listing sells according to the terms of the purchase contract. To do this, you need to identify and track important dates for disclosures, due diligence periods, and other closing requirements. Enter these dates on your calendar to make sure they have been completed, and update your clients when deadlines have (or haven’t) been met by the buyers. Timely communication between yourself and the buyer’s agent is crucial to guarantee all items are checked off before the closing date.
While tracking these deadlines on your calendar can help you monitor transactions, real estate client relationship management (CRM) software ensures you don’t miss a deadline. These are business tools designed to help manage your lead outreach and sales processes, as well as improve your customer relationships. Top-notch CRMs come equipped with functionalities for lead and contact management, sales automation, pipeline monitoring, and business performance reporting.
Pipedrive CRM categorizes leads into pipelines and automates communication through calls, email, and activity. You can add deals, list the deal value, and add expected close dates you need to monitor deadlines throughout the sales process. In addition, Pipedrive’s Smart Docs feature sends and stores trackable documents to clients for signature to guarantee all the transaction’s deadlines are met.
Track Appraisals, Inspections & Title Insurance
The buyer and their lender are generally responsible for scheduling and paying for licensed real estate appraisals and inspections, but as the seller’s agent, you will coordinate property access for those inspections. Work with both parties to arrange access for the appraisal, home inspection, and additional inspections for termites, lead paint, and radon. After reports are released, you may also need to negotiate repairs or credits with the buyer’s agent and track necessary repairs and re-inspections.
In general, title insurance includes owner’s coverage, lender’s coverage, and sometimes extended coverage. Whether or not the buyer or seller covers one or more of these insurance costs depends on the seller’s location. To adhere to standard practices in your area—and the terms of the contract—make sure your seller is meeting their title insurance responsibilities.
Provide the Seller Closing Checklist
While your sellers are sitting idle during the due diligence period, you can offer assistance in preparing to move out of their homes. This involves scheduling deep cleaning, a final walk-through, and making an inventory of needed keys and security codes. It is also helpful to provide a closing checklist for sellers with tasks like shutting off utilities after the closing date, changing their mailing address with the U.S. Postal Service, and making any outstanding payments to the homeowners association (HOA) home-related service companies.
Monitor the Status of Closing Documents & Close
Once the closing date arrives, ensure the seller presents all the necessary items and signs all the required documents. Keep in mind that closing documents are often provided to the seller before closing, and they usually don’t have to attend in person on the actual day of closing. So, this may need to be done a few or even several days in advance.
Sellers should present the following:
- The deed, if the home is paid off
- A valid, state-issued photo ID, such as a driver’s license or passport
- A certified check (if required) in the amount requested by the escrow officer
- Keys and security codes if possession of the house is granted at closing
Sellers will typically be required to sign the following documents (some vary by state):
- Loan payoff: The amount of money left on the seller’s loan that needs to be satisfied at closing
- Property deed: The deed transfers the ownership of the home and property to the buyer on closing
- HUD-1 settlement statement: An accounting of all the money involved in the transaction
- Certificate of title: Sworn statement affirming the seller has the right to sell the property
- Bill of sale: Itemizes any personal property the seller agreed to leave with the home
- Statement of information: Sworn statement guaranteeing the identity of the seller
- Mechanic’s liens: A sworn statement that there is no possibility of a lien being placed against the property by a subcontractor or other laborer for money owed
- Statement of closing costs: Signed statement confirming the seller was informed of various fees and closing costs ahead of time
While you will not be signing documents as the seller’s agent, it is vital to attend when your client signs closing documents for moral support and ensure the transaction is completed correctly. Thinking back to stage one of the listing checklist, you promised your client an end-to-end experience―by fulfilling that promise, you are showing your actual value as a real estate professional. Take this time also to congratulate your client and ask for referrals.
Frequently Added Questions (FAQs)
Bottom Line
While being a real estate sales agent does not come easily, practicing over time sharpens your skills. Download our free real estate listing checklist and use it to keep track of the pre-listing, listing, and closing tasks needed to get you and your clients to a completed transaction seamlessly. Knowing the ins and outs of the listing process and being able to guide a client through this process produces positive reviews and word of mouth, ensuring a pipeline of sellers that will grow your real estate business.


