

There are some things that factory-made cabinetry cannot provide, and creating a customized solution might be an option that best fits your client’s needs. In this article, woodworker Tim Snyder shares his expertise on how to make and install custom paint-grade built-ins, including bookshelves, cabinets, seats, closet organizers, and desks. While every project is unique, the goal is always the same: to create a customized solution that makes better use of the space than stock cabinetry.
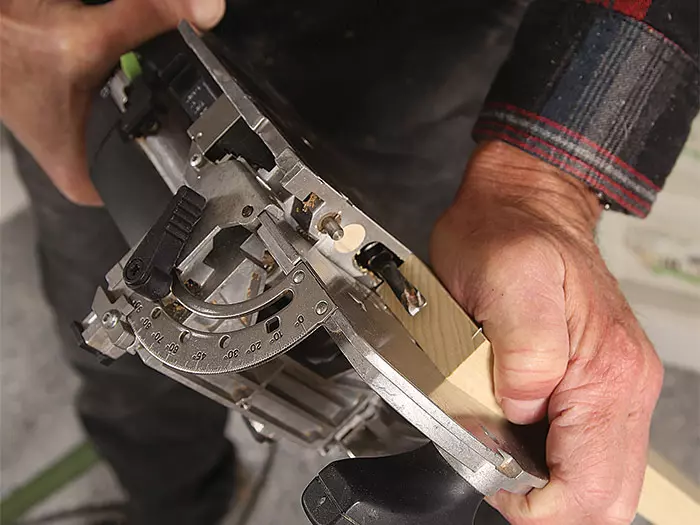
Tool up to make the job easier
If you’re set up to do trim carpentry, then you already have most of the tools required for built-in projects. Snyder relies on a track saw for cutting panels to size and for ripping straight, square reference edges on the poplar boards that he uses to make face frames. He also uses a jig made by Milescraft for drilling pin holes for adjustable shelving.
 Caption: A cutaway sketch can help visualize the finished project.
Start with a site inspection
Before beginning any project, it is important to thoroughly inspect the site. This includes measuring the space, taking note of any angles or obstacles, and identifying framing for fastening. It is also crucial to check for HVAC registers, electrical outlets, light switches, and thermostats that may affect the installation. By conducting a comprehensive site inspection, you can ensure that your built-ins will fit perfectly into the space.
Aim for simplified design
When designing your built-ins, it is important to consider simplicity. Large-scale built-ins should be divided into manageable modules to facilitate transportation and installation. Snyder recommends creating plan, elevation, and detail drawings for every project to optimize material usage and provide a clear vision of the finished product. Additionally, simplifying the construction details can reduce material costs and build time.
 Caption: Plan and elevation drawings provide a visual representation of the finished project.
Make face frames first — then build boxes to match
While the standard practice in cabinet construction is to assemble the casework and then attach the face frame, Snyder has found it more efficient to make the face frame in advance. This is especially true when the case fits inside a three-sided space, such as in many bath vanities. By creating a template to fit the space where the face frame will go, the face frame can be made off-site and then tested for fit before building the cabinet boxes.
Construct the shelves
When constructing the shelves for your built-ins, it can be helpful to have the lumberyard cut plywood case parts to a rough size. This makes the pieces easier to handle and allows for more precise cuts in the workshop. Poplar edging can be added to improve the appearance and strength of the plywood shelves.
Fit the doors
Ordering cabinet doors online to the exact size of the face-frame openings ensures a perfect fit. After a test fit, trim off any excess material for a clean look. Adjustments can be made using a track saw, working in small increments to achieve the desired fit. Non-mortise hinges are recommended for most built-in projects for their ease of installation and reliability.
Stack components for a smooth installation
When installing your built-ins, start with the lowest parts and securely fasten them to the wall. Build the top separately to allow for easy scribing to adjacent walls for a tight fit. Finally, place the shelf unit on the base cabinets and fasten it in place. This method ensures a seamless installation and allows for adjustments as needed.
Prep for a perfect paint job
Before installation, it is important to prepare the built-ins for painting. This includes giving sharp corners a quick plane, sanding all surfaces, and applying a coat of primer. By taking the time to properly prepare the cabinets, you can ensure a professional-looking finish.
Creating custom built-in cabinets doesn't have to be a daunting task. By following these tips from Tim Snyder, you can make the process efficient and enjoyable, resulting in beautiful and functional built-ins that meet your clients' needs.


