Real estate photography is a crucial step in showcasing properties and helping clients sell their homes. However, the post-processing phase can be time-consuming, requiring photographers to use various editing techniques to enhance the images and make them visually appealing. In this article, we will explore some basic and commonly used techniques for real estate photography editing.
Perform Color Correcting
Color correction is an essential step in real estate photo editing. By using tools like Lightroom or Photoshop, you can adjust the colors of the entire image. Simply click on a neutral area with the eyedropper tool to correct the colors. Depending on the photo, you may need to modify the saturation, hue, and tint to achieve a more realistic image.
Straighten the Lines
When capturing property images, it's crucial to ensure that the lines are straight and not distorted. If the lines appear bent, you can always correct them during post-processing. In Photoshop, use the Free Transform tool to align the lines. Select the entire image, and drag the corner opposite to where the lines are leaning towards.
Even Out the Light
Uneven lighting and shadows can be problematic when photographing interiors or exteriors. To address this, use Lightroom to adjust the shadows, highlights, whites, and blacks. Open up the shadows by dragging the Shadows bar to the right, but be cautious not to overdo it. If there are harsh highlights, bring down the highlights bar to reduce hot spots. Additionally, adjust the whites and blacks by holding down the Alt/Option key and dragging the respective bars.
Clean Up the Image with Cloning
Unwanted objects in your photos can be distracting. In Photoshop, you can use the clone stamp tool to remove them. Simply choose a source area, then clone and paint over the object you want to eliminate.
Adjust Clarity
To enhance the overall sharpness and polish of the photo, push the clarity slider to the right in Lightroom. Adjusting the blacks can also add depth and a crisper look to the image.
HDR (High Dynamic Range)
High dynamic range (HDR) is a technique widely used in real estate photography to create a greater range of luminosity. Capture different bracketed images of the subject, then merge them into one to showcase both highlights and shadows.
Lens Correction
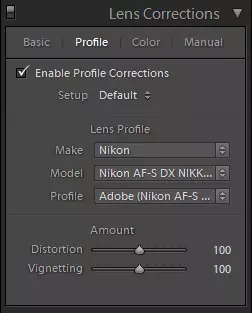
Lightroom offers a handy tool for correcting optical issues commonly found in lenses. Enable Profile Corrections in the Lens Correction module and click on Remove Color Aberration.
Curves
The Curves tool in Photoshop is powerful for color correction and color optimization. It can be challenging to master but allows you to adjust the image's brightness. Experiment with this tool by going to the Image menu, selecting Adjustments, and clicking on Curves. Drag the diagonal line up to brighten the image or down to darken it. Once satisfied, click OK.
Using Image Processor
The image processor tool in Photoshop allows you to resize photos in batches, saving time when working on numerous images for different mediums. Select the File menu, click on Image Processor, choose the folder, select JPEG as the file type, specify desired dimensions, and include the ICC profile before clicking Run.
Playing with Hue and Saturation
Hue and Saturation in Photoshop are useful for color correction, particularly for enhancing greens in exterior and landscape photos. Go to the Image menu, choose Adjustments, and select Hue and Saturation. Adjust the settings for yellow and green, modifying the hue, saturation, and lightness accordingly.
Do Composites
Compositing involves merging different photos to create a seamless image. This technique is useful for blending together flash and ambient shots or combining multiple images for a single photo.
Batch Edit, If Possible
When working on similar edits for multiple photos, consider using Lightroom's batch editing feature. This allows you to save time by retouching and making adjustments to one photo and then syncing those changes across the rest of the images.
Keep It Natural
One final and crucial editing technique is to keep the images looking natural. It's easy to go overboard with editing, but it's important to maintain a natural look to make the photos believable. Remember, the goal of real estate photography is to sell the property, so err on the side of naturalness when retouching your images.
 Caption: Even out the light to create a visually balanced photo.
 Caption: Adjusting curves and brightness in Photoshop can optimize your colors.
By utilizing these real estate photography editing techniques, you can enhance the visual appeal of your images and provide clients with compelling visuals that help sell their properties effectively. Remember to maintain a balance between enhancing the images and keeping them natural to achieve the desired impact.


